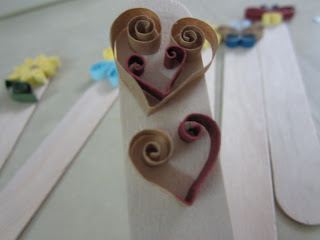
Heard of paper quilling/rolling before? I never thought of trying my hand at it coz it simply looks difficult.
| some awe-inspiring picture of paper rolling art |
Ok la, I just scared myself with those awe-inspiring pictures by punching 'Paper rolling' into Google.
The basics - my version of simplifying the art of paper rolling - roll the paper strips, adjust the rolled paper to a desired size, stick the open end, pinch here pinch there to form a shape, stick the whole thing onto a piece of wood/card/paper, and adjust the shape using a toothpick.
It requires much patience and a fine character.
When the sis suggested to make paper quilling craft for the saints in Taiwan, I thought it was quite impossible.
Anyway, convinced by sis that it's not difficult at all, we started the 3 days marathon of doing paper rolling crafts.
It turned out that the challenging part was not with rolling the paper and shaping it (coz we're doing real simple shapes), but to be creative, coming out with new designs to be shaped into with our rookie rolling skill.
Here's our bookmarks decorated with paper rolling craft.
 |
| I had to squeeze my right brain to come out with designs. Butterfly is our default idea. So to be exact, I only produced 4 own designs in...err...2 days time..*mortified* |
Just as we thought we have had enough, we realised we had to use the same paper rolling craft to decorate banner frames, which size is 10x larger than a bookmark -which means lots empty spots to be decorated, lots of papers need to be rolllleeedd and lottss of designs and arrangement of the designs need to be done.....
Now this is the true art of paper quilling -rolling thin paper strips into various shapes which are then collectively arranged to form designs.
G.A.V.E U.P.
Paper folding, ribbons, stickers, and whatnot were incorporated instead to fill up the remaining empty spots around the banner. We are indeed creative.
Making crafts for the saints is quite suitable gift, IMO, at least from visiting young sisters like us. The saints love them.
 |
| Results of our hard work *proud face* |
I have been searching for some simple and unique bookmark ideas these days. I came across this corner bookmark idea which I found interesting.
Interesting yet not practical. The flower is so heavy that it can outweigh the book itself. Ok maybe not a book, but it certainly is heavier than a booklet. What's the point of having one big heavy paper flower hanging at the side of your book?
Now this origami heart bookmark is much more practical, in addition that it is easier to do and cheaper in cost. All you need is a paper in rectangular shape. Any measurement will do. (I'll recommend 15cm x 7cm)
On a side note, I'm currently obsessed with calligraphy writing.
What is the first thing you learn to write? Your own name.
...and my blog's name
**I've been MIA long enough. This post was actually written about 4 months ago.
So I guess a definition clause is needed.
"In this post, 'these days' or 'currently' refer to 4 months before November 2012."
and drafting lecture said you must show courtesy in everything you write, end it with a thank you.
So...
 |
| Thank you! =) |


